Chat with us, powered by LiveChat
Ru En

Description of the Robot-Waiter Wheeled Platform

Quick menu:


The Robot-waiter platform is designed to deliver small objects weighing up to 8 kg using the remote control via the Internet, by means of receiving and processing data from multiple sensors, Lidar and video signals from the camera for decision making on further action. The robotic platform works in conjunction with the operator.

ro1

The robot is a combination of a mobile platform with a table and a remote presence software.

A Windows OS interface is designed. It provides displaying of the video signal from the platform on the electronic device (computer) of the user/operator.

The robot software runs on a tablet computer with a full Windows 8 operating system and controls the mobile platform. The operator software allows the operator to connect to the robot software via the Internet or a local wireless network. It implements the remote robot control by sending commands to the microcontroller through a tablet computer via a wireless Internet connection or Bluetooth (RS232 in case of the stationary connection).

In the autonomous mode the robot can generate a map of the premises and move to a predetermined point on the premises map.

Fields of Application

  1. Hotels
  2. Restaurants and cafes
  3. Event agencies
  4. Sales rooms and shopping centers
  5. Showrooms and on demo stands
  6. Conferences and exhibitions

This platform is an ideal solution for eating places, such as: restaurants, cafes, time-cafes.

It will be a great help at various corporate events, exhibitions, seminars, where the operator when interaction with the robotic platform will be able to deliver snacks, magazines, booklets, as well as to collect used dishes, thus serving as an assistant waiter. The device will find application in hotels and shopping centers for delivery of correspondence, documents and medical supplies to those in need, such as inhalers, medicaments for emergent cardiac and diabetic care, etc.
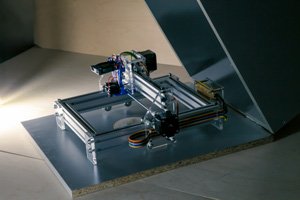
htmlimage (1)

The Robotized Platform Construction

Main components

  • Robot platform body;
  • Robot platform base;
  • Led-acid battery, 12 V, 12Ah;
  • 2 front wheels Ø150 mm;
  • 2 rear castor wheels Ø75 mm;
  • 2 steppers, Nema 23 (18 kg*cm, 3.5 mH, 1 Om, 3А, 12 V);
  • 2 engine control drivers, 5А 12 V (for Nema 23);
  • An OS Windows 8 tablet computer with a built-in WiFi module, a Bluetooth module, 2 USB host and a USB2COM adapter (or a tablet with RS232);
  • 4 IR sensors, SHARP GP2Y02;
  • A Bluetooth module, Mobidick BCRS232T;
  • A computing board with a microcontroller, STM32 (of Endurance’s production);
  • 2 racks for the table legs;
  • 2 table legs with braces;
  • A made to order table (of acryl or any other light material)
  • 2 clamps to fasten the table legs to the platform base;
  • Screws, nuts, ring plates for the robot components assembling together.
  • Additional components:
    A laser distance detector, LIDAR-Lite v2 «Blue Label», with an interface I2C
    A stepper, Nema 17 ( 3 кг*см, 0.4 mА, 12 V)
  • A stepper driver 0.6 mА, 12 V
  • A Hall sensor SS49E
  • Arduino Mega

Sizes

The platform size is 700х500х800 mm (LхWхH). The axle spacing of the wheel base is 380-440mm, taking into account shifting of the rear castor wheels center. The width of the wheel base is 400 mm between the front wheels centers.

ro2

ro3

ro4

Power Supply

The platform is powered by a 12V lead-acid battery of 7Ah capacity or higher.

12V voltage is supplied directly to both microcontrollers, to 2 controllers of the stepper motors, and to all 3 stepper motors. One controller of the stepper motor Lidar, a Hall sensor, and infrared distance sensors are powered by internal microcontroller sources (5 volts).

A special charger (DC 13.8V and at least 1A) is recommended to charge a lead-acid battery.

A Recommended Power Supply Kit

  • A lead-acid battery 12V, 12Аh, 1 pc.
  • A lead-acid battery charger controller, 1 pc.
  • A 5 mm jack socket, 1 pc.
  • A LED, 1 pc.

To replace the power supply elements/batteries remove the robot platform body from its base. To do this, raise the robot platform body, loosen the clamps on the table racks, remove the legs of the table from the racks and remove the body.

The robot assembly after the power supply elements replacement requires the reverse order of action described in the previous paragraph: install the platform body to the base, insert the table legs in the racks, lift the platform body, and tighten the clamps on the racks.

Charge the robot battery before usage. It will no work if the battery is discharged.

Programming

The robot has a few connected program modules on various computing boards.

We use C on IAR ARM to program an STM32 microcontroller (control of engines and distance sensors.

C on Arduino IDE is used to program (Lidar management and measuring preparation).

C++ on MSVC is used for Windows OS (of the robot tablet computer and the operator’s work tool) programing.

IO Ports

2 microcontrollers are used: one – for STM32 engines management and the other – for the Arduino Mega Lidar control.

Utilized Controlling Contacts on STM32

  • 2 pins, set as a digital output for the control of switching (on/off) of the load on the two stepper controllers;
  • 2 pins, set as a digital output for the control of the steppers rotation direction, go to 2 stepper controllers;
  • 2 pins, set as a digital PWM output for the control of the engines step, go to 2 stepper controllers;
  • 4 pins, set as analogue inputs for connection of the Sharp distance sensors;
  • 1 UART for the external control from the tablet (autonomous movement or remote control by an operator via the Internet);
  • 1 UART for the Bluetooth module connection (control by a local operator via a control panel/joystick).

Utilized Controlling Contacts on Arduino Mega

  • 1 pin, set as a digital output for the control of switching (on/off) of the load on the stepper controller;
  • 1 pin, set as a digital PWM output for the control of an engine step, goes to a stepper controller;
  • 1 pin, set as an analogue input for the connection of a magnetic Hall sensor (for detection of the zero point of the Lidar mirror rotation;
  • 1 I2C for communication with a laser distance meter Lidar-Lite V2;
  • 1 USB/UART for external control from a tablet;

A User Interface

In addition to the available online ComConsole app, customer applications are created to control the robot via Bluetooth in the line of site, to adjust the speed and the acceleration speed parameters, to remotely control the platform by an operator via the Internet.

ro_interface

TPRobot is an application running on the OS Windows 8 Tablet, mounted on the robot platform for receiving the operator commands and their further transfer to the computing board of the robot platform and the subsequent transmission of the video and other data from the platform to the operator screen.

ro_interface2

TPOperator is an application, used by the operator on his OS Windows 8 computer/laptop, to adjust the user settings of the connection to the TPRobot application, the robot platform data receipt, their display on the operator screen and the platform motion control.

ro_interface3

A separate interface on the tablet designed for the autonomous operation – map building and a given route following in the autonomous mode.

This application allows the operator to connect any time and change the performance program or switch to the manual control. The map and navigation is based on the LIDAR data. A LIDAR in this design corresponds to a horizontal plane scanning action of a laser distance meter assisted by a step motor. After each measurement made by the distance meter, the controller instructs the stepper to turn by one step (200 steps per 360 degrees). A Hall sensor and a magnet mounted on the mirror are used to determine the zero point.

Assembling

The robot assembly is done once when it is being prepared for use, with subsequent replacement of power supply components/batteries as they discharge.

To assemble the robot of its components it is necessary to have a complete set of the components listed above in the paragraph «The Robot Platform Construction.»

The platform base and the table are the first to be assembled according to the drawings by qualified personnel.

The next stage is connection of the battery to the contour chain of the robot and its performance testing.

If everything is in order, the platform body and the table are installed on the platform base according to the instruction of the robot assembly after the battery replacement, presented in the POWER Section.

In case of the robot malfunction contact the service personnel.

htmlimage (4)

Platform Features

  • min. speed — 0,1 m/sec;
  • max. speed — 1 m/sec;
  • min. acceleration — 0,1 m/seс2;
  • max. acceleration — 0,5 m/seс2;
  • sizes (LхWхH) — 700х500х800 mm;
  • noise level – op to 30 dB;
  • operation time from the battery – 5 hours and more;
  • obstacle climbing, h – up to 4 cm;
  • a camera — 1 pc;
  • weight – 20 kg;
  • a screen;
  • a microphone – built-in in the tablet + an exterior boom mic connected to the tablet optionally;
  • speakers – built-in in the tablet + an exterior speaker connected optionally;
  • environmental specifications — T from -5 to +30 С.

Functional Features

  • Can deliver ordered dishes on the table up to 8 kg
  • Travel speed — up to 1 m/sec (3.6 km/h)
  • Obstacle detection and avoidance
  • Works in 3g, 4g networks and WiFi.
  • Controlled by an operator by means of a special control panel via any messenger: Skype, Linphone, Viber, WhatsApp, etc.
  • Battery life — 5 hours and more.
  • An OS Windows 8 tablet is used to transfer and receive audio and video signals.

htmlimage

Performance Features

  • The travel and acceleration speed is controlled by means of the ComConsole software, connected to the platform via the Bluetooth wireless channel;
  • platform management by an operator is possible via the Bluetooth protocol in the line of sight up to 20 meters, or remotely via the internet, provided the platform is in the Wi-Fi coverage area and is connected to a Windows 8 tablet, installed on the platform, and the tablet transmits commands to the platform motors via RS232 (or Bluetooth). In this case images from the tablet camera are transferred to the operator’s computer screen in real time.
  • the robot is able to move in a straight line and turn around its axis situated between the front wheels; it is also able to maintain a stable position on an inclined plane with 150 grade angle and a load up to 8 kg, fixed on the table top;
  • due to the wheelbase parameters (380-440 mm in length and 400 mm in width), the low gravity center (at the of 80 mm), the front wheels diameter of 150 mm and that of the rear rotary wheels of 75 mm, the platform is highly stable, even with dynamically sharp changes of the motion direction at the limit speeds for these types of motors, leading to both longitudinal and transverse inertia;
  • self-stopping of the moving platform at obstacles detection on the path of travel by its Sharp infrared sensors crisscross installed at the front and rear of the platform, to «see» not only what is up ahead, but also what is over there to the right and to the left, to detect complex obstacles, and also when turning.

htmlimage (2)

Safety Instruction

htmlimage (3)

The wheel platform robot-waiter is a combination of radio and mechanical components that requires safe handling and a high qualification personnel to maintain the robot.

The following usage conditions must fully comply with the conditions of operation of the individual radio technic units, described on the websites of manufacturers of those units (batteries, tablets, Bluetooth modules, motors).

When manually giving the robot a command to move, the operator is strongly recommended taking due care to avoid encounter with people and other dynamic and static obstacles.

Safety Requirements

  • In the manual mode it is forbidden to give the robot commands to move if the operator does not see the robot or has no information of its position on the control panel.
  • It is forbidden to use the robot if the battery is installed outside the platform base.
  • When you connect the battery to the general mains supply the voltage must comply with the specified on the charger.
  • Do not keep the device in high temperatures. Do not leave it near heaters or under direct sunlight.
  • The robot-waiter is to be used only in dry atmospheric conditions (indoors, under roof or outside in dry weather).
  • Do not use the device in the conditions different from those described in this manual.
  • Do not place on the device objects exceeding the acceptable weight and size. Do not step on it.
  • Turn off the device if you don’t use it: Turn the power off; unplug the power cord.
  • Protect the power cord from damage: do not pull on it and do not bend it.
  • Do not use the device near water. Protect it from exposure to water.
  • Have the device repaired only by qualified personnel. Improper repairs can be life-threatening.
  • Before using the device make sure that the charger plug and the charging base are well connected. Otherwise, it can lead to the battery charging failure or even to a fire outbreak.
  • The warranty will be invalid if the device is used for improper purposes, or the device has been subjected to an unauthorized repair.
  • We reserve the right to make changes in the robot design and specifications, as well as fix to software bugs.

Maintenance Tips

  • To prolong the battery life, charge it for at least 12 hours when you charge it for the first time.
  • If the appliance is not used for a long time, the peak battery performance is reached after 2-3 cycles of operation and charging.
  • Be sure to turn off the power of the robot during transportation or long storage, otherwise it can lead to the battery failure.
  • If you do not plan to use the Robot for a long time, fully charge the battery, remove it and store it in a cold place — it will enlarge its life.

If you notice any signs of the product malfunction or failure, contact qualified personnel.

Quality Assurance

The warranty period for the product is 6 months, but not more than 24 months from the manufacture date*.

During this period you can exercise your right to free correction of the product defects and to satisfaction of other consumer requirements established by the legislation regarding the product quality in case of the proper product usage and compliance with the rules of its operation contained in this manual.

To avoid confusion, keep the product warranty card and payment conforming documents.

The warranty does not apply to the product in case of:

  • defects resulting from negligence, non-compliance with the operation rules, improper product usage, natural wear and tear;
  • unauthorized changes in the design or software;
  • usage of spare parts from another manufacturer;
  • repair by unauthorized persons;
  • damage during transportation;
  • adjusting, cleaning, replacement of consumables and other maintenance works;

Product shipping to the service center is paid by the buyer.

Keep the warranty card and payment conforming documents for the life time of the product!

For all maintenance issues or acquisitions of accessories and consumables, please contact the retailer from whom you purchased the product.

*the battery guarantee is 6 months.